
After some firmware update the Site-to-Site tunnel stopped working in reverse order. The reason is a new option on Client side in Network settings section, which is by default in disabled state. Change the value to “Allow”:
![]()
After some firmware update the Site-to-Site tunnel stopped working in reverse order. The reason is a new option on Client side in Network settings section, which is by default in disabled state. Change the value to “Allow”:
![]()
As the Outlook (even 2016) can’t handle RSS feeds with “https://”, here is a small and simple proxy reading the encrypted RSS feed and returning it via “http://”
I stored is as “index.php” file in root folder of subdomain on my web server. if you want to use it in another way, please edit the “action=”/”” parameter in form tag .
<?php
if ( isset ( $_GET["RSSfeed"] ) )
{ // get the feed and display it
$sURL = urldecode ( $_GET["RSSfeed"] );
$sFile = file_get_contents($sURL);
echo $sFile;
}
else
{ // display welcome page
?>
<html>
<head>
<title>RSS Proxy for Outlook</title>
</head>
<body>
<h1>RSS Proxy for Outlook</h1>
<p>As the Outlook can't handle RSS feeds with "https://", here is a small and simple proxy reading the encrypted RSS feed and returning it via "http://"
<p> </p>
<ol>
<li>Enter the RSS Feeed URL and press Enter:
<form action="/" method="get">
<input type="text" name="RSSfeed" size="80">
</form>
</li>
<li>Copy the address from the URL line of your browser</li>
<li>Enter it while adding RSS Feed to Outlook</li>
<li>Enjoy! :)</li>
</ol>
</body>
</html>
<?php
}
?>
I have one old HP Microserver N40L on remote site running ESXi 5.0 and I wanted to upgrade it to version HPE 6.5 (is the last version supporting the pre-Gen9 servers).
Unfortunatelly, the N40L has no iLO by default and I have no “hand-and-eyes” who could install it from inserted CD and I was lazy to travel one hour to the remote location and one hour back…
I have read in VMware documentation about possibility to upgrade via so called “offline package”. The article was not quite correct and all tries ended with some dependency error.
I have then found on one forum the right solution (omitted parameter), so here is the summary how to install it:
esxcli software sources profile list -d "/vmfs/volumes/DataStore 1/Depot/VMware-ESXi-6.5.0-Update2-9298722-HPE-preGen9-650.U2.9.6.8.3-Sep2018-depot.zip"
Name                                           Vendor                      Acceptance Level
---------------------------------------------  --------------------------  ----------------
HPE-ESXi-6.5.0-Update2-preGen9-650.U2.9.6.8.3  Hewlett Packard Enterprise  PartnerSupported
esxcli software profile install -d "/vmfs/volumes/DataStore 1/Depot/VMware-ESXi-6.5.0-Update2-9298722-HPE-preGen9-650.U2.9.6.8.3-Sep2018-depot.zip" -p HPE-ESXi-6.5.0-Update2-preGen9-650.U2.9.6.8.3 --ok-to-remove --dry-run
mv /store /store.old

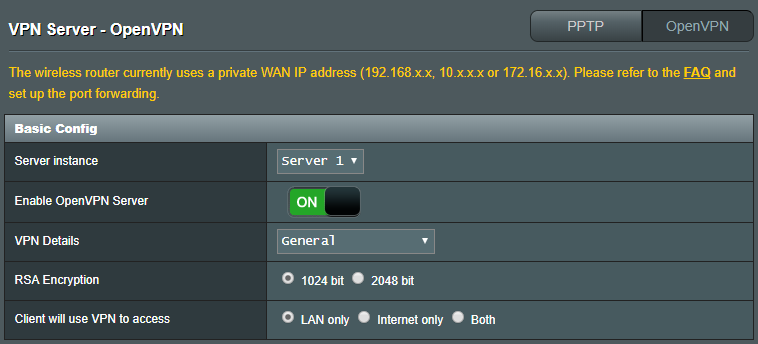
The OpenVPN is an open multiplatform VPN solution, which allowing variety of configuration. The standard use-case is client2network setup, allowing the remote client to “dial-in” into network. Other scenario is site2site configuration, allowing seamless communication of each network device across both sites.
I have two Asus RT-AC66U_B1 running Asuswrt-Merlin firmware version 384.9 with following network configuration:
The setup consists of two steps:


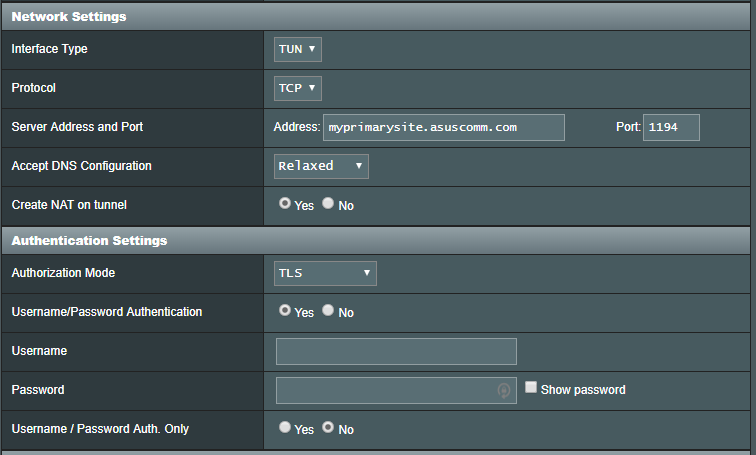
reneg-sec 432000

client
dev tun
proto tcp-client
remote myprimarysite.asuscomm.com 1194


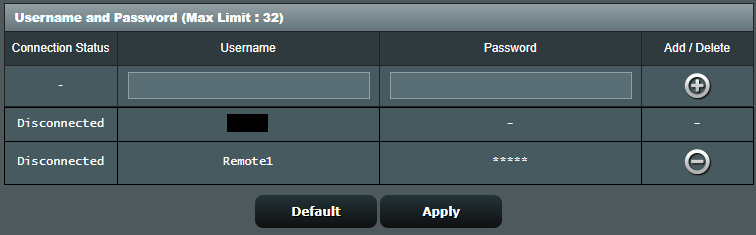
root@RT-AC66U_B1-5668:/temp/home/root# cd /jffs/configs
root@RT-AC66U_B1-5668:/jffs/configs#
root@RT-AC66U_B1-5668:/jffs/configs# mkdir openvpn
root@RT-AC66U_B1-5668:/jffs/configs# cd openvpn
root@RT-AC66U_B1-5668:/jffs/configs/openvpn# mkdir ccd1
root@RT-AC66U_B1-5668:/jffs/configs/openvpn# cd ccd1
root@RT-AC66U_B1-5668:/jffs/configs/openvpn/ccd1#
root@RT-AC66U_B1-5668:/jffs/configs/openvpn/ccd1# vi Remote1
iroute 192.168.33.0 255.255.255.0
reneg-sec 432000
username-as-common-name
push "route 192.168.22.0 255.255.255.0"
client-config-dir /jffs/configs/openvpn/ccd1/
route 192.168.33.0 255.255.255.0
After reconnecting the tunnel the communication should be possible in both directions
This how-to is based on following article: https://openvpn.net/community-resources/how-to/#scope and adopted by me for my two Asus routers running Asuswrt-Merlin firmware.
(c)2019 by zolo